After struggling with a number of ways to put a bike rack on my Specialized Allez Pro, I eventually bought a Tubus Disco bike rack.


The Tubus Disco rack is actually designed for bikes with disc brakes. However, after visiting a store with Tubus products, and visualizing every rack up against my road bike, I decided on the Disco.
Had the dealer I visited known that the Luna, or Fly -required- bending, and perhaps cutting the round stay, I might have bought one of those. So, to be fair, perhaps this is not the right rack for my bike.
The Disco is an innovative design. If you don't have eyelets for the rear rack, you can use their special extra long quick release skewer. The rack then rests on the quick release skewer.
Experience:
There was some success. But a lot of issues.
Missing Documentation/Instructions/Nuts:
The package came with bolts, but no nuts. I had to find some other nuts to use, but I can't remember exactly where (notes made over 2 years ago).
I could not find PDF instructions for it anywhere. They were not on the Tubus website, or other suppliers'. However, there were instructions for other racks. Disappointing. Nor was there even any picture of the Disco rack correctly mounted on any bicycle. Just a rack on a seamless background.
So, I had questions as I went.
There were multiple size spacers; Which size do I use? Answer: the large ones.
Just what side are those spacers supposed to go?

Answer: between the rack, and the bike frame.
Fastening:
At the top, to anchor the Disco to the seat stays, there are, get this, SIX fasteners! Two to clamp to the seat stay. Two to secure each roundstay clamp assembly from moving side to side. Two to secure each roundstay clamp assembly from moving forward and back.
While this gives a lot of flexibility, on the Specialized Allez Pro that I had, it was really tight to get it all to work. I finally tried putting one roundstay of the bike rack, between the brake arms and the brake cable. But there was barely any clearance.

Very Tricky Installation On My Bike:
The installation was really tricky and time consuming. Part of this is because of the narrow seat stays on this bike, and the narrow rack from Tubus. Not much room to work.
When you put in the wheel with the Tubus quick release, the nuts need to be loose at first so that you can adjust the rack to a level position.
The crazy thing is, the bolts to clamp the roundstays from moving back and forth are on the inside! These nuts are not accessible from the outside. At least that is what was shown on the seamless picture from Tubus.
So, you have to put in the wheel to make the adjustments. But once the wheel is in, you can't access the bolts to make the adjustment!
Now that I had the wheel in place, and the rack horizontal, I could not access the nuts. The seat stays of my bike were so narrow. Even with a 1 mm thick Mafac tool wrench. The rack moved back and forth slightly, about 1/2 inch.
Tubus says to mount it securely. And I like things to stay put. So, I marked the roundstays with a mechanical pencil, and took the wheel out. Then clamped the roundstays in place.
However, when I put the rear wheel back in, it would not go in correctly. There had been some movement of the rack, which of course affected the wheel via the quick release skewer. The result was that the rear wheel now permanently rubbed the brake pads! Sigh! And this is with a frame and wheel combination that is so well made, that the wheel always drops perfectly in place.
I was thinking that if I had a spare hub, with no rim attached, it would have made installation easier. I could have put the quick release skewer onto that hub, and attached the Disco rack. However, you would still need to get the wheel in, to adjust the rack exactly level.
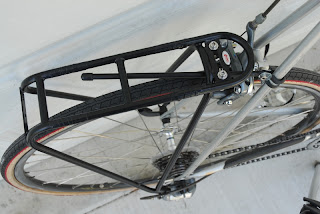
Attempt 2, Remove the left roundstay.
Another Saturday, I took another look. I knew that I had to secure all the fasteners at the same time. I loosened the right roundstay clamp assembly and turned the nut to the outside. Now the roundstay went at an angle across what little room there was.
So, I used only one roundstay to attach to the seat stay. But I could successfully secure all the remaining (three) fasteners at once. See the picture.

Notes:
If you ride through puddles, the rack has no fender effect.
The length of the rack on top is shorter than other racks. Only 11 inches. For the hooks of your panniers, there is only 8 inches of useable range between the crossbars. It does however, work with my old Kirtland panniers. Just.

Other racks have longer range. The Planet Bike Eco Rack has about 11.5 inches of useable range to hook your panniers into.
And the top of the rack is rather narrow. Only 3 1/4 inches outside measurement. You need to make sure a flat object will stay in place. The Planet Bike Eco Rack is 5 1/4 inches wide.
If the whole top of the rack were wider, there would be more room to manoeuvre the roundstays when mounting.
There are roundstays from Tubus available with bends in them. In 5, 8, 12 and 35mm offsets. Although, it's hard to know which ones to use until you get started. If dealers are to carry these racks, it would be good for them to keep a good selection of parts available. They then could sell the accessories. Or charge to mount the rack and mount any accessories needed to do it right.
Rear Wheel Removal:
Whenever I take my bike in the car, I put it in the trunk, by taking off both wheels. Now, with this rack, I would have to take a longer time to get the rear wheel off and back in. I feared that I would have to make rack adjustments every time I put the wheel back in, and bring the tools.
On the rear wheel, I mounted a heavier tire that had Kevlar in it for puncture resistance. Fixing a rear wheel flat on the road is irritating enough. Now, with the Disco rack, removing and replacing the wheel would be trickier. Fortunately, in all the time that I spent with this bike and rack, I never had to fix a rear tire or spoke.
When you remove the wheel, do it on a large expanse of clean concrete, not grass. Or put a towel underneath. If you miss catching those round spacers when they drop, they can roll away.
Advantages of the Tubus Disco Rack for Road Racing Bikes:

The Tubus Disco rear rack mounts onto road racing bikes that have no eyelets for a rack.

The Disco rack is one of the very few that will actually mount level to a racing bike's tight rear triangle, with steep seat stays. And still not collide with the rear brake.
Avoids having a framebuilder braze on eyelets (and then repaint). Or, allows you to feel how the road bike feels with weight, to help you decide if you want to get those eyelets brazed on.
Light.
There is a warranty for registered customers. Tubus says that it will ship parts to registered customers anywhere in the world. Although I've heard some problems with this.
The rack is pushed back far enough that my heels don't hit the panniers.

Disadvantages:
No online documentation, or pictures of the rack mounted on other road bikes.
Tricky installation on my road bike. Two roundstays and six fasteners are really difficult to use with road bikes. In my case, I had to eliminate one roundstay (and three fasteners).
Getting the rear wheel in and out is tricky, and takes longer.
High Price. $130 or more. It's difficult to believe that the Disco rack could not made/sold at a cheaper price. After buying this older bike, $130 is a serious percentage of the cost of the bike! A framebuilder quoted me much less than the rack to braze on eyelets for me.
I would expect that the 8 inches of useable range between the crossbars may not work with some panniers, that have hooks spaced wider than 8 inches. Test first.
Wish List for Tubus:
Proper PDF documentation.
Pictures of the rack mounted on various bikes.
Change the design so that the roundstays are tightened from the outside, not inside.
Final Solution:
In the end, I decided to give this Specialized to my brother, and bought a Soma Smoothie instead. Partially because of the rack issue.
The Soma Smoothie has eyelets for the racks and fenders, and the Tubus Disco works really well on it. Since I could attach the Disco to the frame, I could remove the wheel and adjust the rack. Although, I still think that the design should be changed so that the bolts are tightened from the outside.
I had very similar problems with Tubus Fly Classic. I cannot bend that single roundstay and there is no clearance with the brake pivots. I need to get to a bike shop to see what they can do.Which makes the brake unsafe. I also had the same problem with my back wheel rubbing against the frame after a brief ride with the pannier on. Documentation for QR set (additional cost!) was for a different version than shipped. Also spent many hours on a Saturday on this. FOr such a premium product the attention to detail for the website and instructions is awful. Hey Tubus let me know if you want to get in touch with some service designers...
ReplyDelete